For years, we’ve been told that the key to flexibility is to just hold a stretch longer and push a little harder. But what if that’s not the whole story? If you’ve been diligently stretching your hamstrings with little to show for it, it’s not your fault—you might just be using the wrong tool for the job. There’s a smarter, more scientific way to convince tight muscles to release. It’s called PNF stretching, and it works by tapping into your body’s own reflexes. Instead of forcing a muscle to lengthen, you guide it. This article will break down the science and show you exactly how to perform pnf stretching exercises for hamstrings to finally make progress and move past your flexibility plateau.
Key Takeaways
- Work with your body, not against it: PNF stretching uses a contract-relax sequence to tap into your nervous system. By gently tensing your hamstring against resistance before stretching, you signal the muscle to release more deeply than it would with a simple static hold.
- Warm up first and listen for the right kind of tension: Always spend 5-10 minutes on light cardio before you begin. A successful stretch should feel like a deep, productive pull, not a sharp or stabbing pain—if you can’t breathe comfortably, you’re pushing too hard.
- Consistency is more important than intensity: Lasting flexibility comes from regular practice. Integrate PNF stretching into your post-workout routine 2-3 times a week to make it a sustainable habit that improves mobility and reduces chronic tightness.
What is PNF Stretching?
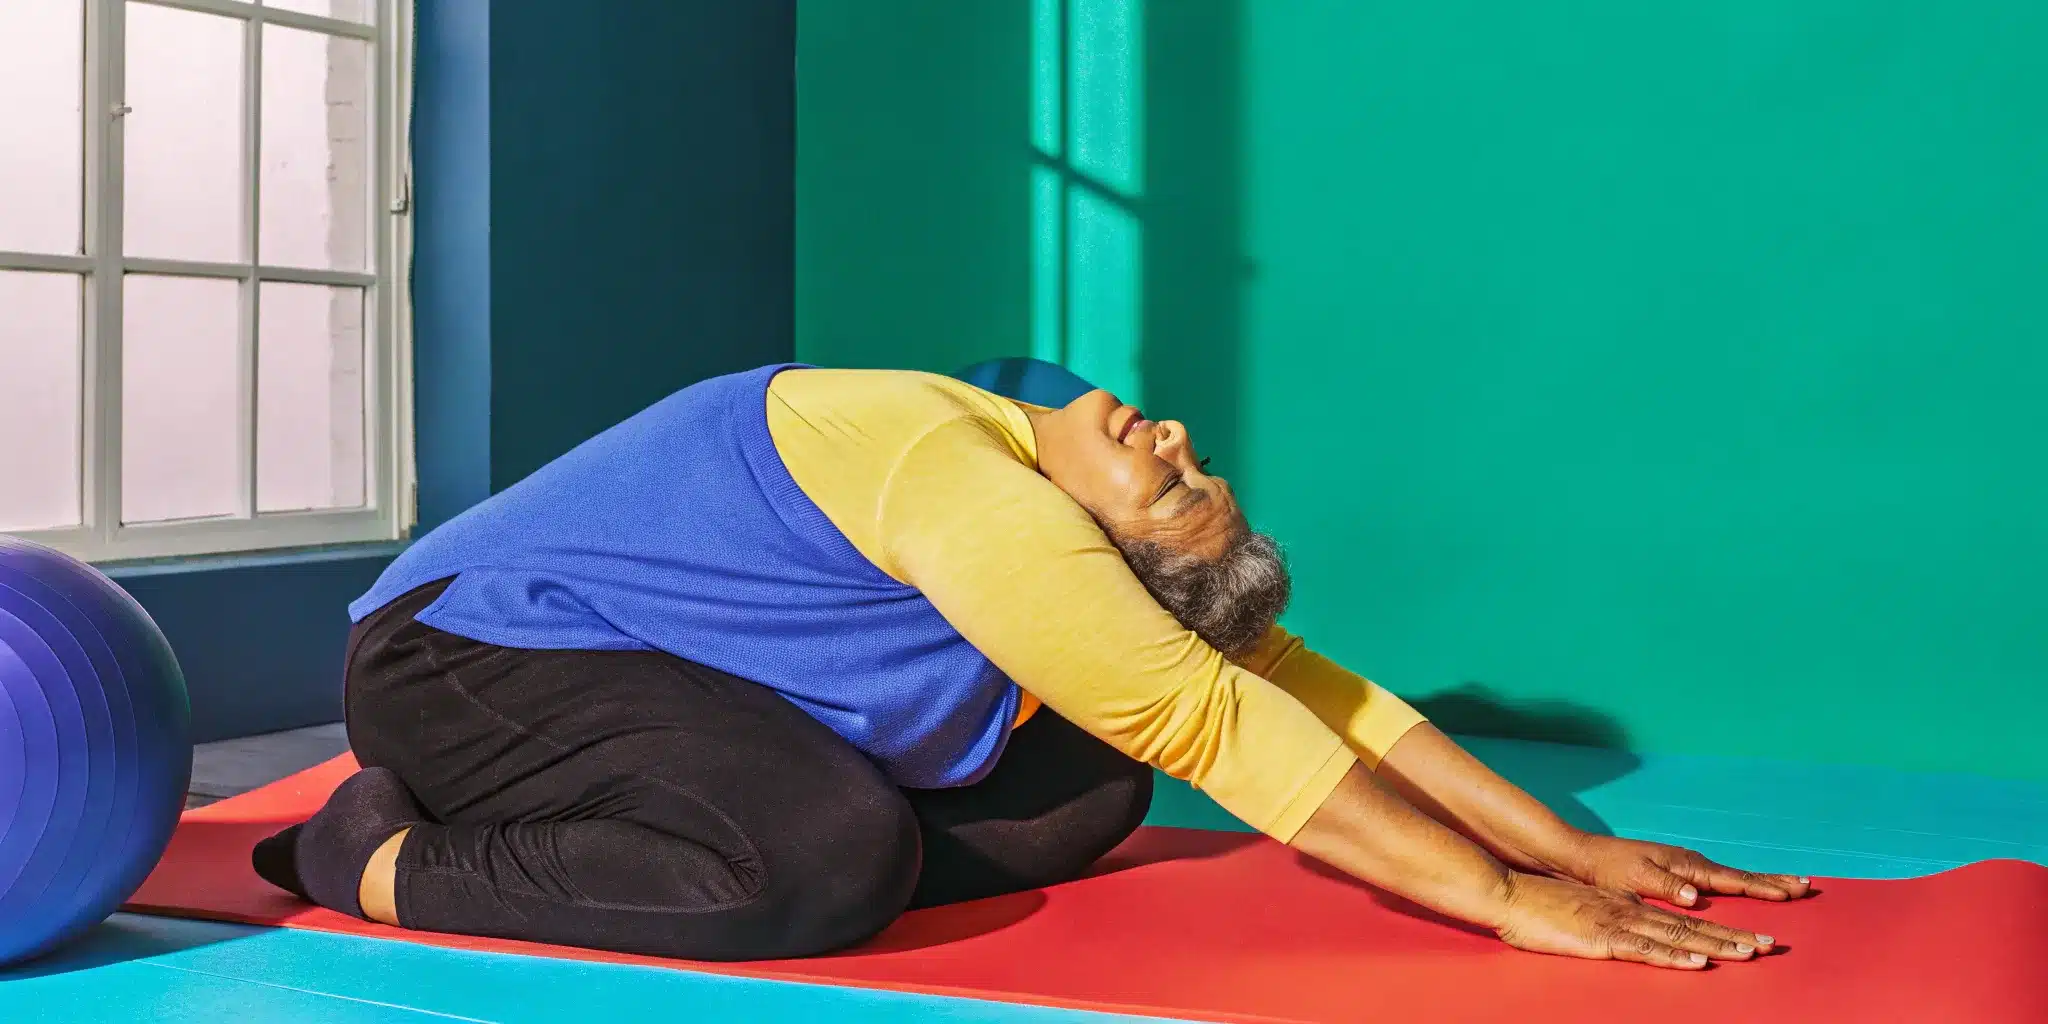
If you’ve ever felt like your regular hamstring stretch just isn’t cutting it, you’re not alone. Sometimes, just pulling on a tight muscle isn’t enough to convince it to let go. That’s where PNF stretching comes in. The full name is a mouthful—Proprioceptive Neuromuscular Facilitation—but the concept is pretty simple. It’s an advanced stretching technique that physical therapists, trainers, and stretch professionals use to help people gain flexibility faster than with traditional static stretching.
Instead of just passively holding a stretch, PNF involves a series of movements that has you contracting and relaxing the target muscle. This approach works with your nervous system to essentially “trick” your muscles into relaxing more deeply. By tapping into your body’s own reflexes, you can achieve a greater range of motion and release long-held tension. It’s a more active and targeted way to stretch, which is why it’s a go-to method for tackling stubborn areas like the hamstrings.
How PNF Actually Works
The secret behind PNF is the contract-relax sequence. Think of it as a conversation with your muscles. First, you gently ease into a passive stretch, just to the point of light tension. Then, instead of just holding it, you actively contract that same muscle against a fixed object (like a partner’s hand or a wall) for a few seconds. This is the “contract” phase. When you release that contraction, your muscle’s natural reflex is to relax more fully than before. This brief window of relaxation is where the magic happens, allowing you to ease into a deeper, more effective stretch. This cycle is what makes the PNF stretching technique so powerful.
Why It’s So Effective for Tight Hamstrings
The hamstrings are notoriously stubborn. Because we spend so much time sitting, they often become short and tight, which can lead to other problems like lower back pain and poor posture. PNF is particularly effective for this muscle group because the active contraction phase helps override the muscle’s protective tightening reflex. Research has shown that PNF stretching can create a greater increase in range of motion compared to static stretching alone. For anyone who feels like they’ve hit a plateau with their hamstring flexibility, PNF can be the key to finally making progress and finding lasting relief.
Clearing Up Common PNF Myths
One of the biggest myths about stretching is that you should do deep stretches before a workout to prevent injury. In reality, stretching a “cold” muscle can do more harm than good. PNF is best performed after a workout when your muscles are warm, or as a dedicated flexibility session. Another misconception is that PNF is only about flexibility. While it’s fantastic for that, the benefits don’t stop there. The techniques also help improve your muscular strength, joint stability, and overall coordination. It’s a comprehensive approach that improves your functional ability, helping you move better and with more confidence in your daily life.
How to Prepare for a Safe and Effective Stretch
Before you jump into any new stretching routine, a little prep work goes a long way. Taking a few minutes to get ready ensures you get the most out of every session while keeping your body safe from injury. Think of it as setting the stage for a great stretch. These simple steps will help you prepare your muscles, understand your starting point, and decide on the best approach for your body.
What You’ll Need (It’s Not Much!)
You don’t need a home gym or expensive gear to get started with PNF stretching. The best tool you have is your own body. To help you get a little deeper into the stretch, you can grab a partner or use a simple stretching strap. If you don’t have a strap, a yoga belt, a long towel, or even a dog leash can work just as well. The goal is to have something that helps you gently guide your leg. The beauty of these PNF stretching exercises is that they are effective with just the bare essentials, making them easy to do almost anywhere.
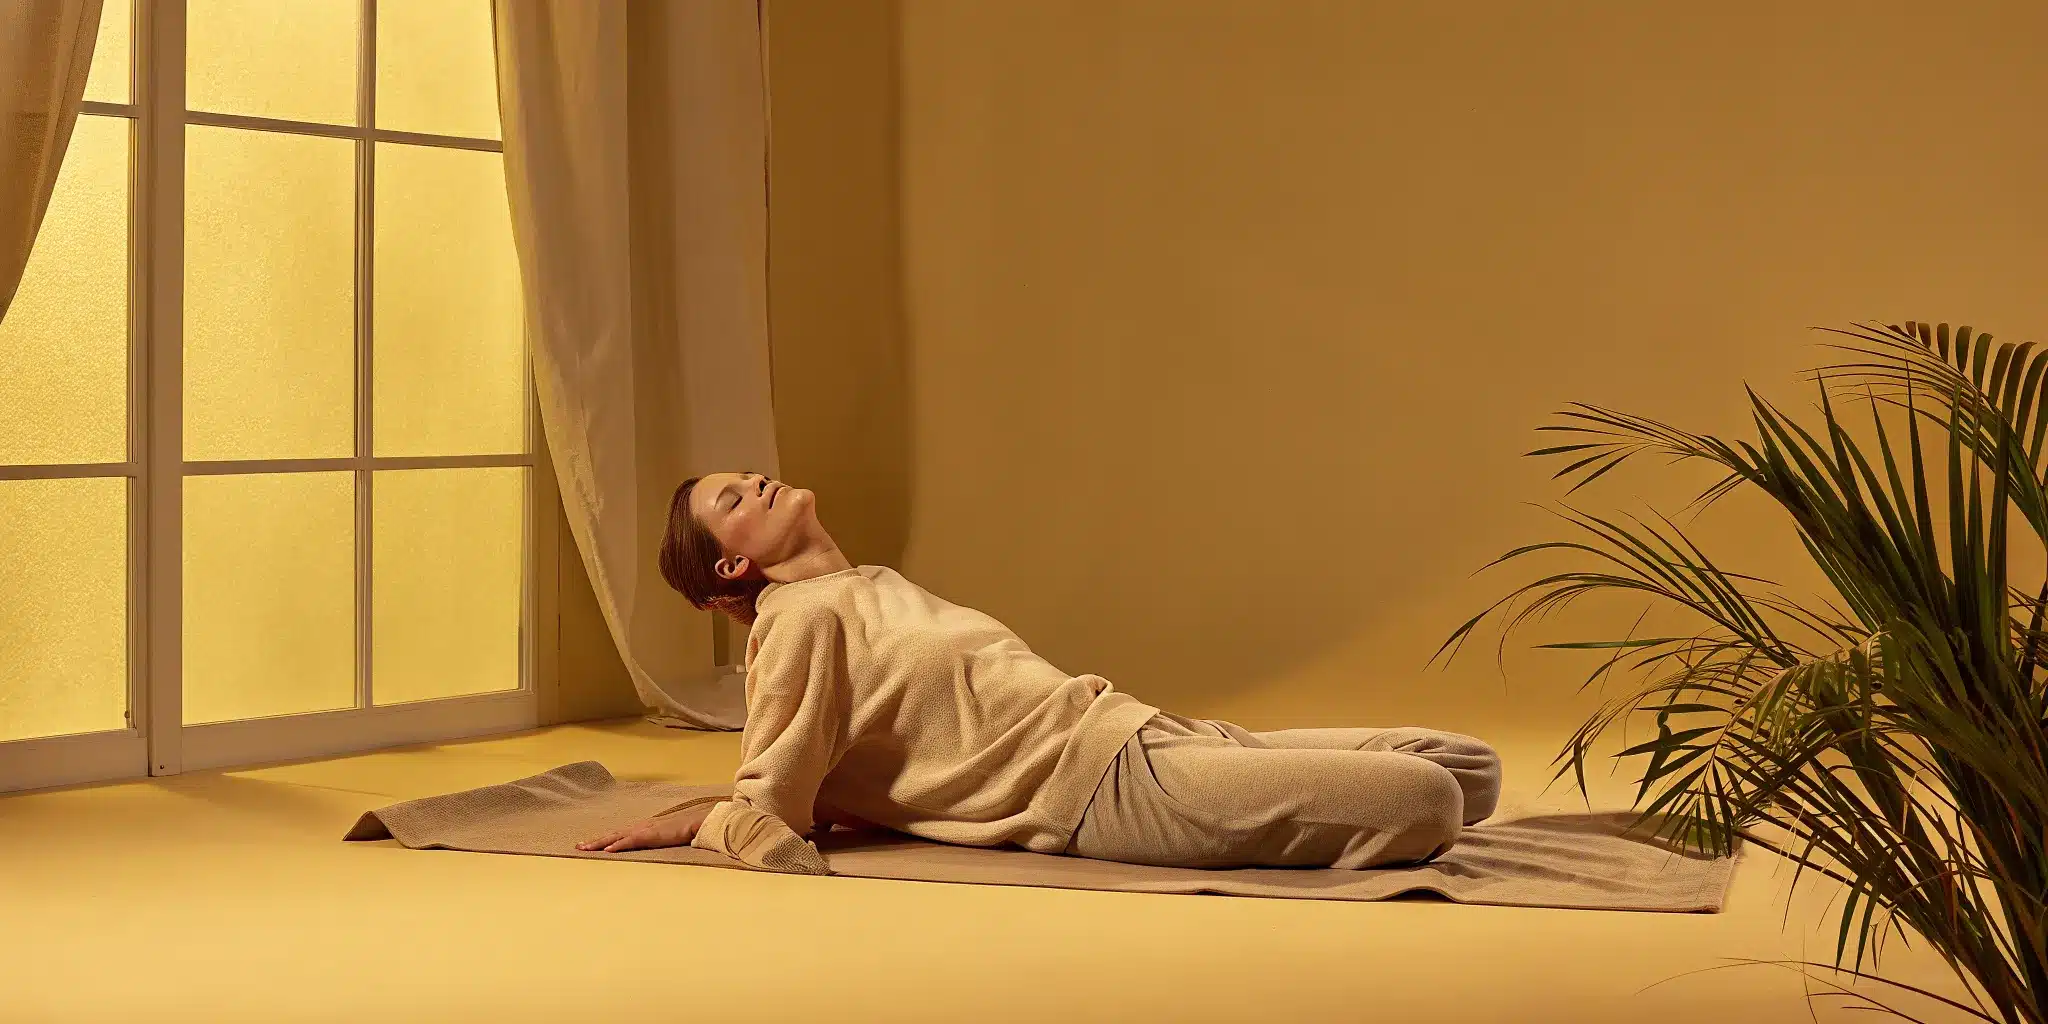
The Right Way to Warm Up
Please, promise me you won’t stretch cold muscles. It’s one of the biggest mistakes people make. Before you begin, spend about five to ten minutes warming up your body to increase blood flow to your hamstrings. This doesn’t have to be intense—a brisk walk, some light jogging in place, or a few minutes on a stationary bike will do the trick. You can also try some dynamic stretches like leg swings or walking lunges. The goal is to feel a little warmer and get your heart rate up slightly. This simple step makes your muscles more pliable and ready to stretch safely.
Check Your Starting Flexibility
Before you start trying to touch your toes, it’s helpful to know where you’re starting from. A quick self-assessment can give you a realistic baseline for your hamstring flexibility. Here’s an easy way to check: lie on your back with both legs straight. Keeping one leg on the floor, slowly lift the other leg straight up toward the ceiling. Normal flexibility generally means you can lift your leg to at least a 90-degree angle without bending your knee. Don’t worry if you’re not there yet! This isn’t a test; it’s just information to help you gauge your progress and stretch safely within your limits.
Stretching Solo vs. With a Partner
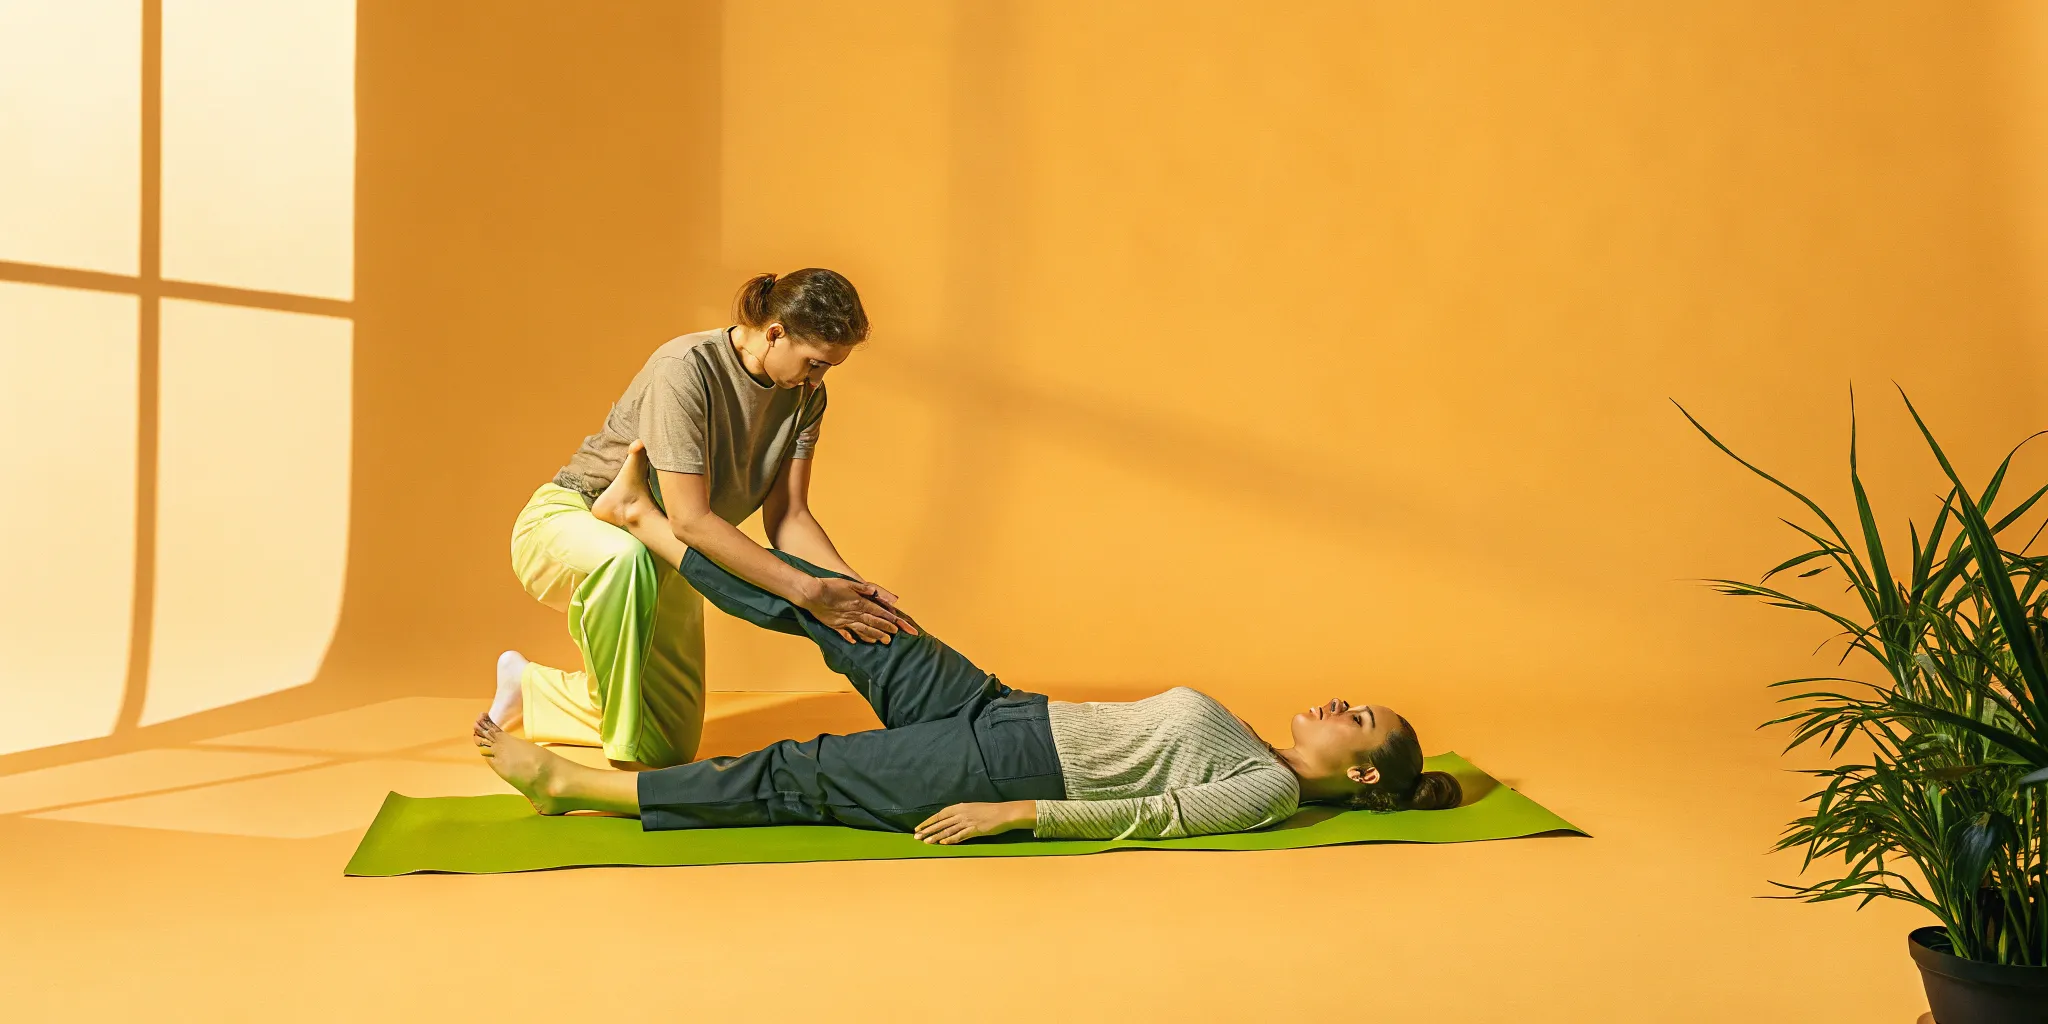
You can absolutely do PNF stretching on your own using a strap, but having a partner can be a game-changer. When someone assists you, they can help move your leg into a passive stretch, which is when your muscles are relaxed while your partner encourages them to lengthen. This often allows for a deeper and more controlled stretch than you might achieve alone. Of course, communication is key—your partner needs to listen to your feedback and never push you too far. If you’re going solo, a strap gives you the control to apply gentle, steady pressure yourself. Both stretching techniques are effective, so you can choose what feels best for you.
Your Step-by-Step Guide to PNF for Hamstrings
Ready to give your hamstrings the release they’ve been waiting for? This guide breaks down the most common PNF technique, often called “contract-relax,” into simple, manageable steps. Whether you’re stretching on your own with a strap or have a partner to help, these instructions will walk you through the process safely. Remember to move slowly and listen to your body—the goal is to feel a good stretch, not sharp pain. Let’s get started.
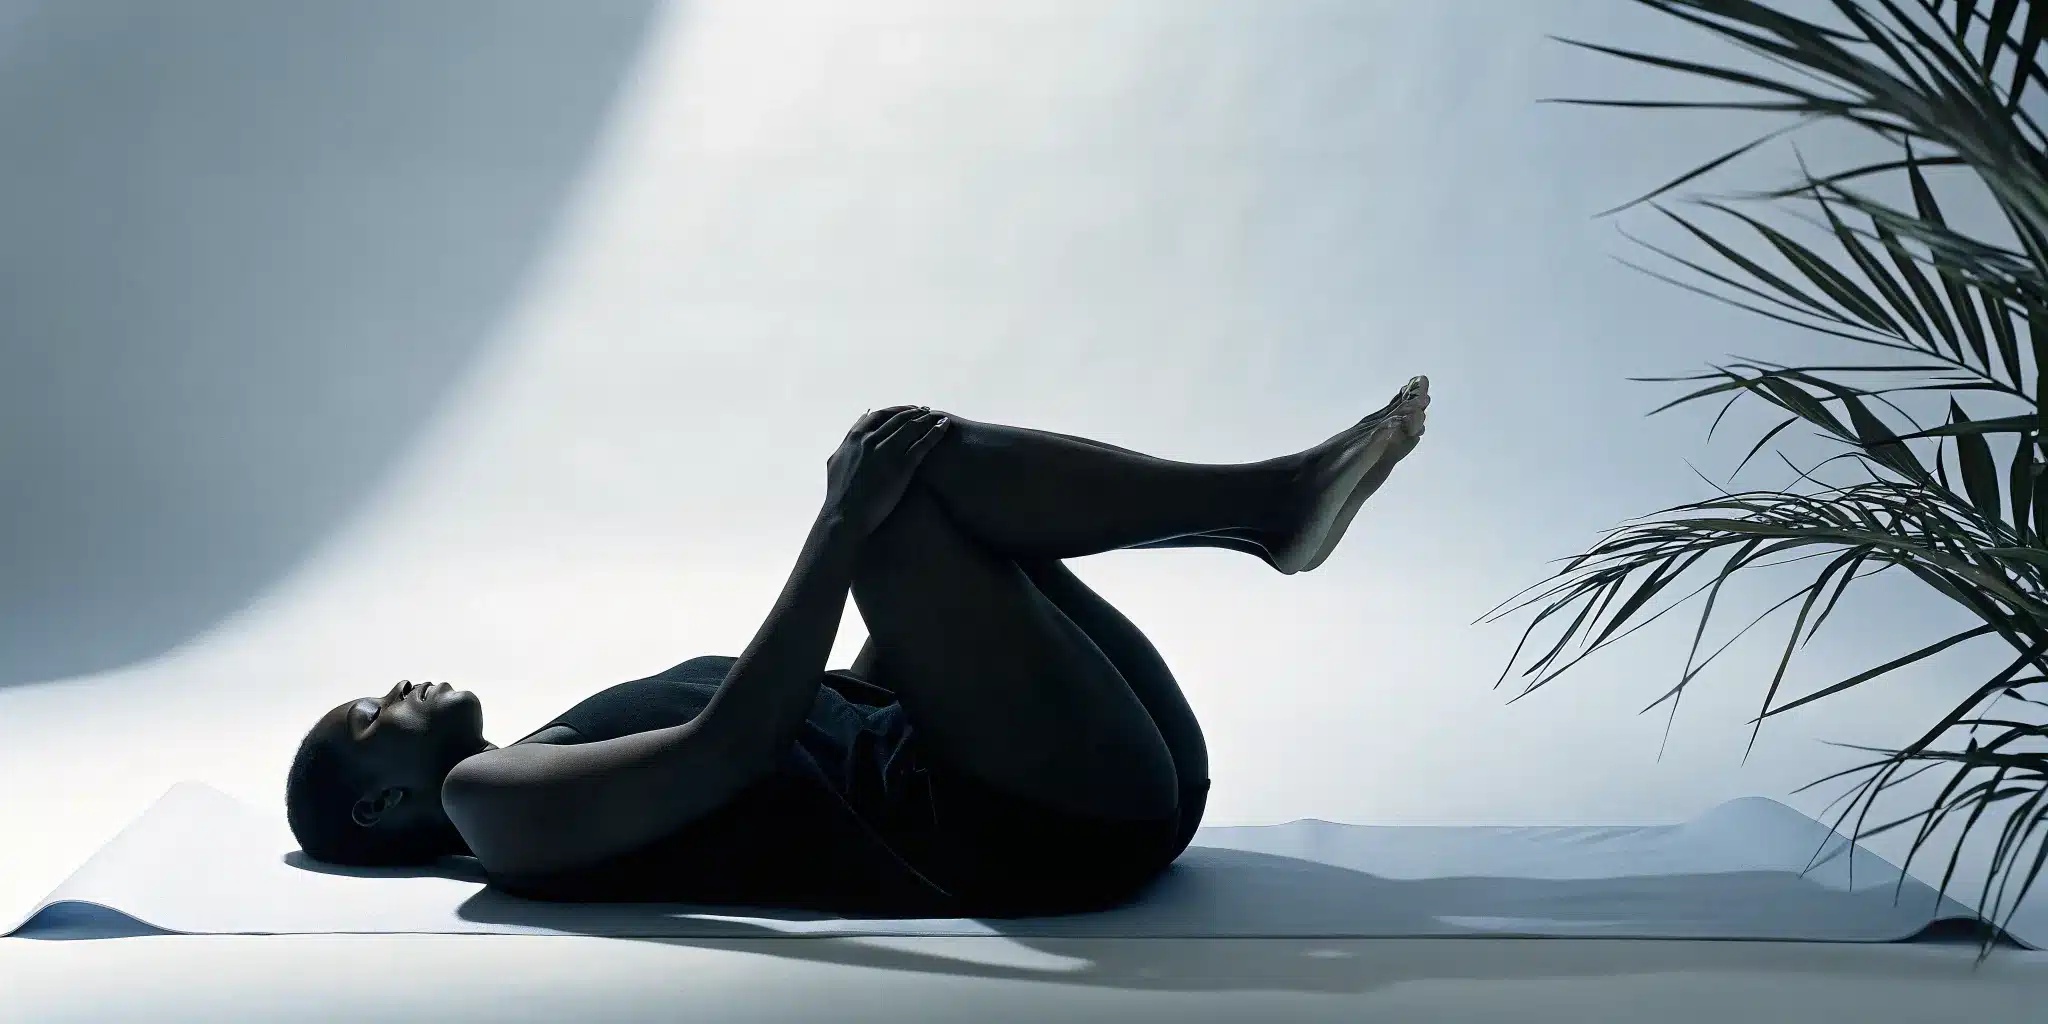
Step 1: Get Into Position
First, find a comfortable spot on the floor. Lie on your back with both legs straight. You might want to use a yoga mat for extra cushioning. Bend one knee and keep that foot flat on the floor for stability. Extend your other leg straight up toward the ceiling, keeping it as straight as you comfortably can. This is your working leg. Gently grasp the back of your thigh or calf with your hands, or loop a yoga strap or towel around your foot. Pull the leg toward you until you feel a mild to moderate stretch in your hamstring. This is your starting point.
Step 2: The Contract Phase
Now for the “magic” part. Keeping your leg in the same position, begin to gently push it away from you, as if you’re trying to lower it back to the floor. Your hands or the strap will provide resistance, so your leg won’t actually move. This is an isometric contraction. You should feel your hamstring muscle engage and work against the resistance. It’s important to keep your hips on the floor and avoid arching your back. Hold this gentle but firm contraction for about 10 seconds. You’re not fighting yourself, just activating the muscle.
Step 3: The Relax Phase
After holding the contraction for 10 seconds, take a deep breath in, and as you exhale, completely relax the hamstring muscle you were just tensing. Let all the tension go. This is a crucial moment in the PNF cycle where your nervous system allows the muscle to release more fully. Take a moment to simply let your leg feel heavy and supported by your hands or the strap. This brief pause prepares the muscle for the next phase, allowing you to find a deeper stretch than you could before.
Step 4: The Stretch Phase
Immediately after relaxing, gently and slowly pull your leg a little closer to your chest, moving into a deeper stretch. You should notice that you can move it further than you could in your initial position. Only go as far as you feel a comfortable stretch—it should never be painful. Hold this new, deeper stretch for about 20 to 30 seconds. This final hold helps your muscles adapt to their new length, which is key for improving your long-term flexibility. Repeat this entire cycle 2-3 times on the same leg before switching to the other side.
How to Breathe Through Each Step
Your breath is one of your most powerful tools for an effective stretch. Proper breathing control helps relax your nervous system and your muscles, allowing for a deeper release. Here’s a simple pattern to follow:
- Initial Stretch: Breathe normally as you find your starting position.
- Contract Phase: Take a breath in before you start. As you push against your hands, you can either hold your breath or exhale slowly and steadily.
- Relax & Stretch Phase: This is the most important part. Take a big, deep exhale as you release the contraction and move into the deeper stretch. Imagine you are breathing out all the tension from the muscle. Continue to breathe slowly and deeply as you hold the final stretch.
Tips for Your Stretching Partner
If you have someone helping you, communication is key. Your partner should provide gentle and steady resistance, never forcing your leg into a painful position. Their main job is to act as a stable barrier during the contract phase and to gently guide your leg into the deeper stretch during the final phase. A critical tip for partner stretching is to ensure your hips stay flat on the floor throughout the entire exercise. If your pelvis starts to lift off the ground, you’re pushing too far, and the stretch will be less effective and potentially unsafe. Your partner can help by placing a hand on your hip to monitor its position.
Ready to Go Deeper? Advanced PNF Techniques
Once you’ve mastered the basic PNF sequence, you might be ready to try a few variations. These advanced techniques play with different types of muscle contractions to help you achieve an even deeper, more effective stretch. They are fantastic for gently pushing past a flexibility plateau. Think of them as different tools in your stretching toolkit—each one works a little differently, and you might find that one feels more effective for your body than another. Experiment with them to see what gives your hamstrings the best release.
The Hold-Relax Technique
This is one of the most common PNF methods, and for good reason—it’s incredibly effective. You’ll start by settling into a passive hamstring stretch, just until you feel a light pull. Then, you’ll gently push your leg against your partner’s resistance (or a wall or strap) without actually moving it. This is called an isometric contraction. Hold this gentle push for about 5-10 seconds, then completely relax. As you exhale, your partner will guide you into a deeper stretch. This technique uses a principle called autogenic inhibition, which essentially signals your muscle to relax more fully after the contraction, allowing for a greater range of motion.
The Contract-Relax Method
The Contract-Relax method is a close cousin to the Hold-Relax technique but with one key difference. After the initial passive stretch, instead of just pushing against resistance without moving, you’ll actively push through a range of motion. For example, you would push your leg against your partner’s hand, and they would provide just enough resistance to make it challenging as you move your leg back toward the starting position. After holding that contraction for a few seconds, you relax and move into a deeper passive stretch. This active component can sometimes create an even stronger relaxation response in the muscle, helping you find a little extra length.
The Hold-Relax-Contract Variation
If you’re looking for the most effective PNF technique, this one is often it. It combines the best of the other methods and adds another layer of neuromuscular magic. You’ll perform the Hold-Relax portion as described above: passive stretch, followed by an isometric contraction. But after you relax, you’ll actively use the opposing muscles—in this case, your hip flexors and quads—to pull your leg further into the stretch. This move engages reciprocal inhibition, where contracting one muscle group helps its opposite to relax. You’re essentially using your own body to deepen the stretch, making it a powerful way to increase flexibility.
How to Perform These Stretches By Yourself
You don’t always need a partner to reap the benefits of PNF stretching. A simple yoga strap, towel, or belt works perfectly as a stand-in. To try it, lie on your back with one leg extended on the floor. Loop the strap around the arch of your other foot and gently pull the leg toward you until you feel a good stretch in your hamstring. This is your starting position. Now, perform the “hold” phase by gently pushing your foot into the strap for 6-8 seconds, as if you’re trying to lower your leg. Then, relax completely and use the strap to pull your leg a little further into the stretch. You can repeat this cycle two or three times for a fantastic solo stretch session.
How to Get the Best Results from PNF Stretching
Consistency is your best friend when it comes to seeing real, lasting changes from PNF stretching. It’s not about pushing yourself to the limit in one session; it’s about showing up for your body regularly. By creating a simple, sustainable routine, you give your muscles the time and repetition they need to learn a new, more flexible way of being. Think of it as a conversation with your body—one that gets easier and more productive the more you have it. Here’s how to structure your efforts for maximum benefit without burning out.
How Often and How Long Should You Stretch?
To start, aim to practice PNF stretching on your hamstrings two to three times a week, making sure to take a day off in between sessions to allow your muscles to recover. Each session doesn’t need to be long. Focus on completing two to four cycles of the contract-relax-stretch sequence per leg. For each cycle, a good rule of thumb is a 5-10 second contraction, a brief 2-3 second relaxation, followed by a 20-30 second gentle stretch. By working with your body’s natural reflexes, PNF stretching is an incredibly effective way to increase your flexibility and range of motion without spending hours on the mat.
A Simple Plan for Making Progress
The best way to see progress is to make PNF stretching a non-negotiable part of your existing routine. A great time to do it is after a workout when your muscles are already warm and pliable. Integrating PNF stretching into your cool-down can reduce muscle tension and help your body wind down. If you’re not working out, a five-minute warm-up of light cardio, like walking or jogging in place, will do the trick. Start with a gentle intensity and focus on your form. As you become more comfortable, you can gradually increase the duration of the final stretch or the intensity of the contraction.
Taking Care of Your Body Post-Stretch
After a good PNF session, your hamstrings might feel a little tired, and that’s completely normal. You’ve just asked them to work in a new way! To help them recover, focus on hydration and gentle movement. Drink a glass of water and consider a short, slow walk to keep the blood flowing. PNF stretching is an excellent tool to lengthen muscle tissue and restore healthy function, so giving your body proper care afterward is key. A warm bath with Epsom salts can also be a wonderful way to soothe any mild soreness and thank your body for its hard work.
Simple Ways to Track Your Flexibility
Seeing your progress is a huge motivator. While you’ll likely feel the difference in your daily movements, tracking it can be very rewarding. One of the simplest methods is the classic sit-and-reach test. Before your first session, sit on the floor with your legs straight out and see how far you can reach toward your toes. Make a note of it, and then re-test every couple of weeks. You can also take a quick photo or video of yourself in your deepest hamstring stretch. Over time, these visuals will show you just how much your hamstring flexibility has improved, providing both immediate and long-term proof of your efforts.
What to Do When You Feel Stuck
Hitting a plateau is a normal part of any fitness journey, including your flexibility work. If you feel like your progress has stalled, don’t get discouraged. First, revisit your technique to make sure you’re breathing deeply and not forcing the stretch. Sometimes, simply varying your stretching routine can be enough to challenge your muscles in a new way. You could try a different PNF technique, like the hold-relax-contract variation, or slightly change the angle of your stretch. If you’re still feeling stuck, it might be time to seek professional guidance. Working with a stretching professional can help you safely push past plateaus and ensure your form is perfect.
Avoid These Common PNF Stretching Mistakes
PNF stretching is incredibly effective, but like any powerful tool, you have to use it correctly. A few small adjustments can make the difference between amazing progress and a frustrating injury. Let’s walk through some of the most common mistakes people make so you can stretch safely and get the flexibility you’re looking for. Paying attention to these details will help you get the most out of every single session.
How to Perfect Your Form
It’s easy to get caught up in trying to stretch deeper and forget about the basics. But when it comes to PNF, form is everything. Many people make small mistakes that can make the stretch less effective or even risky. To get the most out of your routine, it’s essential to focus on performing the PNF hamstring stretch correctly and safely. For example, when stretching your hamstrings, focus on keeping your back straight and hinging from your hips, rather than rounding your lower back. A rounded back puts stress on your spine and takes the focus off the hamstring. Remember, a slightly shallower stretch with perfect form is far better than a deep stretch with bad form.
Understanding Good vs. Bad Pain
This is a big one. How do you know if you’re stretching or straining? A successful stretch should feel intense, but it should never be painful. Think of it as a “good” discomfort—a deep pulling sensation that you can breathe through. If you feel a sharp, stabbing, or pinching pain, that’s your body’s warning signal to back off immediately. A great way to check in with yourself is to monitor your breathing. You should be able to breathe normally throughout the stretch. If you find yourself holding your breath or gritting your teeth, the stretch is too intense. Learning to listen to these signals is key to making safe, sustainable progress.
Finding Your Ideal Stretch Intensity
It can be tempting to push as hard as you can, thinking it will lead to faster results. However, stretching is not a “no pain, no gain” activity. Pushing too hard can easily lead to muscle strains or other injuries that will set you back. The goal is to find that sweet spot where you feel a strong stretch but no pain. It’s so important to respect your body’s limits on any given day, as your flexibility can change based on your activity level, hydration, and even stress. Instead of forcing your muscles into submission, think of it as gently inviting them to release. This patient approach will protect you from injury and lead to much better long-term results.
When to See a Professional
While PNF stretching is safe for most people, there are times when it’s best to get an expert opinion first. If you’re dealing with chronic low back pain, a previous hamstring injury, or a condition like Lower Cross Syndrome, it’s a good idea to check in with an expert. A professional can help determine the root cause of your tightness and ensure that stretching is the right approach for you. They can also provide modifications or alternative exercises to keep you safe. If you’re unsure about your form or have persistent pain, it’s always wise to consult a healthcare professional or a certified stretching specialist before you begin a new routine.
Build Your Own PNF Stretching Routine
Now that you understand the techniques, it’s time to put them into practice. The real magic of PNF stretching happens when you make it a consistent part of your life. Creating your own routine isn’t about following a rigid, one-size-fits-all plan. It’s about understanding your body’s unique needs and building a practice that helps you feel your best. Think of it as a conversation with your muscles—some days they’ll be ready for a deep stretch, and other days they might need a gentler approach. The key is to show up for yourself regularly.
Building a routine is your personal roadmap to less pain and greater mobility. It helps you stay on track, measure your progress, and turn a new habit into a lasting part of your wellness journey. Whether you’re aiming to touch your toes for the first time in years or simply want to move through your day with more ease, a structured plan will get you there faster. In the following steps, we’ll walk through how to create a simple, effective, and sustainable PNF stretching routine that works for you.
Set Achievable Flexibility Goals
Let’s be real: you probably won’t be able to do the splits overnight, and that’s completely okay. The most successful routines start with small, realistic goals. Maybe your first goal is to hold a hamstring stretch for 30 seconds without wincing, or perhaps it’s to reduce the tightness you feel after sitting all day. PNF is a powerful technique for increasing your range of motion, but progress takes time. Setting achievable milestones helps you see how far you’ve come and keeps you motivated. Write down your goals and celebrate every little win along the way—it makes the journey much more enjoyable.
Listen to Your Body and Adapt
This might be the most important rule of stretching: always listen to your body. PNF can feel intense, but it should never be painful. There’s a big difference between the discomfort of a deep stretch and sharp, shooting, or sudden pain. If you feel the latter, ease up immediately. Your body sends you signals for a reason. Some days you’ll feel more flexible than others, and that’s normal. The goal is to challenge your muscles, not punish them. If you have any injuries or underlying health conditions, it’s always a good idea to consult a healthcare professional before starting a new stretching routine.
How to Add PNF to Your Current Routine
You don’t need to overhaul your entire schedule to make room for PNF stretching. The easiest way to build a habit is to attach it to something you already do. The best time to perform PNF stretches is when your muscles are warm, so try adding them after your regular workout, a brisk walk, or even a hot shower. You could also dedicate 10-15 minutes on your rest days to focus solely on flexibility. By integrating PNF stretching into your existing routine, you’re more likely to stick with it. Consistency is what creates real, lasting change in your flexibility and reduces muscle tension.
A Strategy for Long-Term Flexibility
Think of PNF stretching as a long-term investment in your body’s health. While you’ll likely feel some immediate relief, the most profound benefits come from consistent practice over time. This technique cleverly uses your body’s own reflexes to help your muscles relax and lengthen more than they would with a standard static stretch. This not only improves your flexibility in the moment but also contributes to healthier, more resilient muscles down the road. By committing to a regular routine, you’re building a foundation for long-term muscle health and better overall performance in all your daily activities.
Frequently Asked Questions
How is PNF different from the regular stretching I’m used to? Think of regular static stretching as simply pulling on a muscle until it lengthens. PNF stretching is more like a conversation with your nervous system. Instead of just holding a stretch, you actively contract the muscle against resistance before relaxing and stretching it again. This contract-relax cycle convinces your muscle’s protective reflexes to ease up, allowing you to achieve a deeper and more effective release than you could with a simple passive hold.
Is it okay to do PNF stretching every day? It’s best to give your muscles a day of rest between PNF sessions. This type of stretching is more intense than a simple static hold, and your body needs time to recover and adapt to the new range of motion you’re creating. Aim for two to three sessions a week on non-consecutive days for the best and safest results. On your off days, you can always do some gentle, dynamic movements to keep things loose.
Should the “contract” part of the stretch hurt? Absolutely not. You should feel your hamstring muscle working and engaging, which might feel intense, but it should never be sharp or painful. The goal is a firm, steady push against resistance, not an all-out battle with your own leg. If you feel any pinching or sharp pain, you’re pushing too hard. Ease up on the intensity and focus on a gentle, controlled contraction.
Can I still get a good stretch if I don’t have a partner? Yes, you can definitely have a great solo PNF session. A yoga strap or even a long towel is a fantastic tool for providing your own resistance. By looping it around your foot, you can control both the contraction and the depth of the stretch. This method gives you complete authority over the intensity, ensuring you never go too far past your comfort zone while still getting all the benefits.
What’s the single most important thing to remember when starting PNF? Always warm up your muscles first. Never, ever try to perform a deep PNF stretch on cold muscles. This is the fastest way to cause an injury. Spend at least five minutes doing some light activity like walking, jogging in place, or leg swings to get your blood flowing. Warm muscles are more pliable and ready to stretch, which makes your session safer and much more effective.